Embedding Bump.sh in your own portal
If you want to offer a fully branded developer experience, Embed Mode is for you. It lets you serve your Bump.sh documentation under your own domain, within your own portal, with your own layout, headers, footers, and custom scripts.
This guide walks you through how it works, how to set it up, and how to make it yours.
What is Embed Mode? #
Embed Mode lets you integrate Bump.sh-generated documentation inside your own frontend stack, giving you 100% control over your branding and navigation.
It’s designed for larger teams and companies who need their docs to look and feel like a native part of their platform or developer experience.
The Embed mode is available in our custom plans. If your current plan doesn’t include access, feel free to contact us so we can assist you.
Benefits #
- Looks and feels like your own docs site
- Keep control over headers, navigation, footers, and scripts
- Works with your existing proxy/CDN setup
- Bump.sh handles rendering, versioning, and hosting while you stay in control of the experience
How it works #
Here’s a high-level view of how requests and rendering flow in Embed Mode:
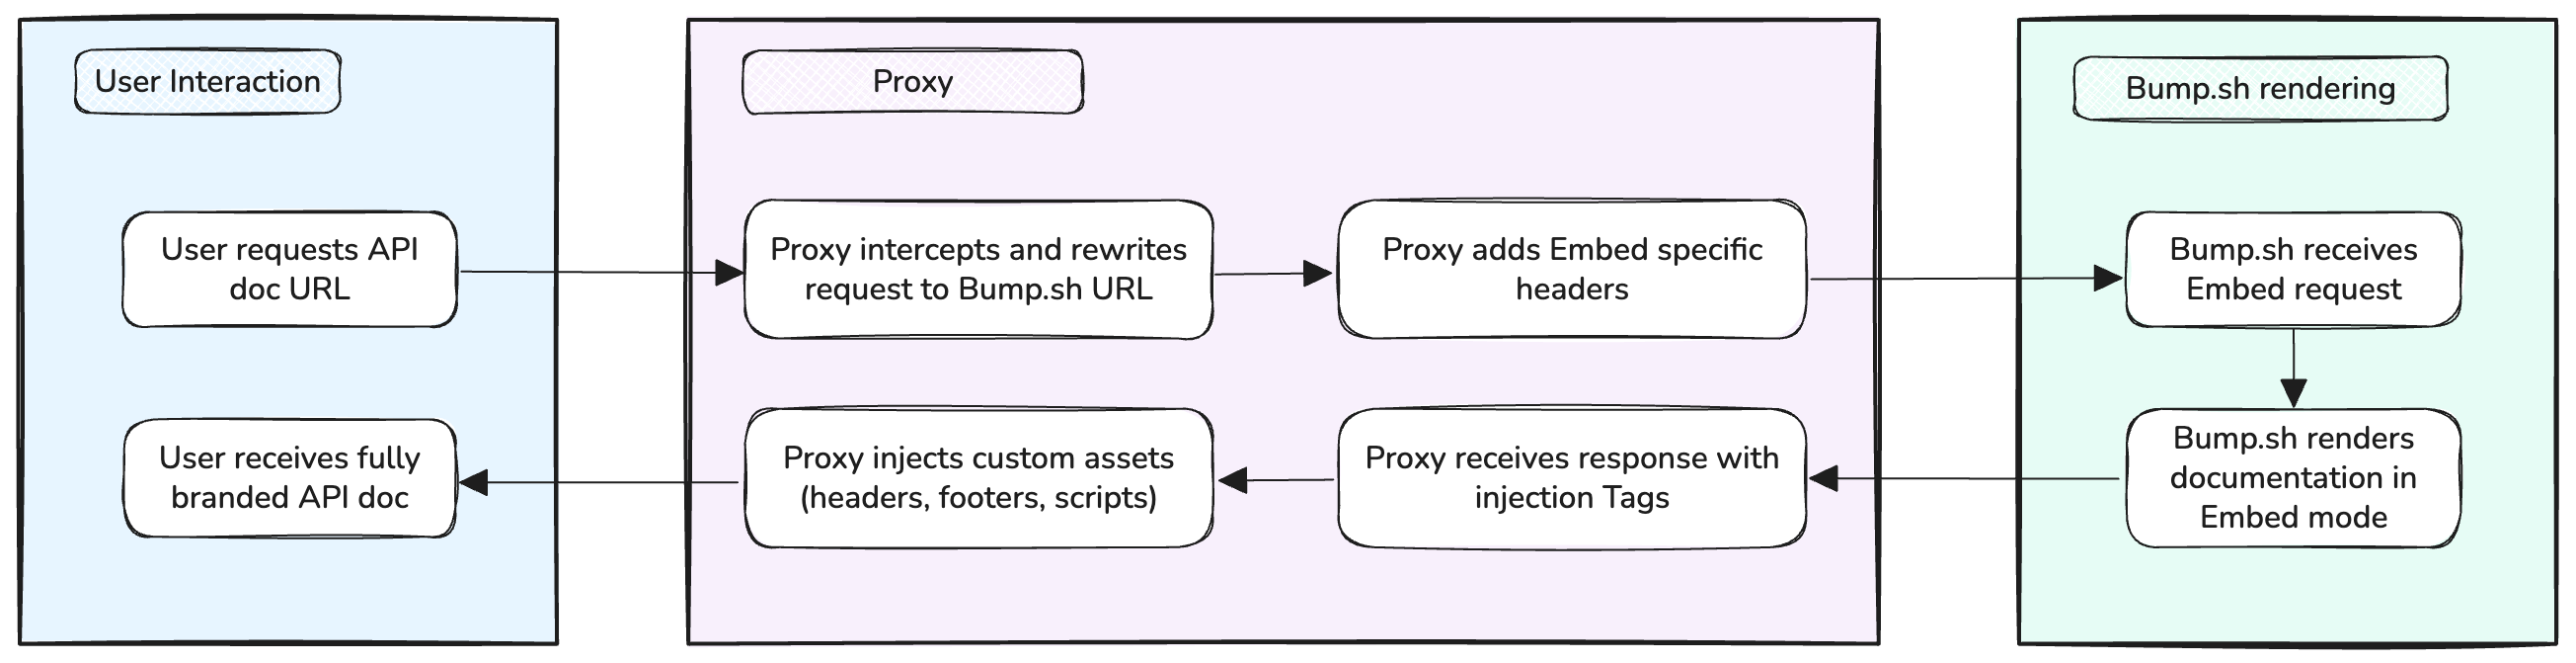
Step-by-step flow #
- A user visits a URL like
https://yourdomain.com/docs/... - Your proxy intercepts the request and rewrites it to point to the equivalent Bump.sh documentation URL
- The proxy adds two headers:
X-BUMP-SH-PROXY: YOUR_SECRET: a secret token to activate the proxy modeX-BUMP-SH-EMBED: true: activate the embed mode
- Bump.sh renders the documentation page including the content (intro, topic, group, operation…), menus, and metadata
- The proxy injects your custom assets (headers, footers, scripts, etc.) into the response
- The result is a fully integrated documentation page that feels native to your portal
Integration Guide #
Configure your proxy #
To use Embed Mode, you’ll need a reverse proxy in front of Bump.sh that can rewrite and forward traffic correctly.
- Rewrite URLs from your domain to your public Bump.sh documentation URLs
- Make sure the required headers (
X-BUMP-SH-PROXYandX-BUMP-SH-EMBED) are added to each proxied request
Bump.sh will start rendering in Embed mode: it will change the layout and scrolling mechanism to adapt to your header, and will inject 3 customization zones in HTML that can be safely manipulated.
Customize the experience #
You can inject up to three types of content into the page: head, topbar and footer.
Head injection
Insert content into the <head> section: stylesheets, metadata, scripts. This is were you can apply your branding by specifying CSS variables, load your own fonts and Javascript, and add custom scripts.
<!-- Bump.sh: head start -->
<meta name="custom-head" />
<!-- Bump.sh: head end -->
Topbar injection
Add a custom top bar, including your logo, main website links, search engine, language switcher, auth links, etc… This topbar is automatically hidden when the user scrolls down to keep most of the content visible.
<!-- Bump.sh: top-body start -->
<div id="embed-top-body"></div>
<!-- Bump.sh: top-body end -->
Footer injection
Show a branded footer with support links or legal information.
<!-- Bump.sh: bottom-body start -->
<div id="embed-bottom-body"></div>
<!-- Bump.sh: bottom-body end -->
Custom CSS
You can safely style your documentation using the following CSS variables:
--font-family: the global font family;--heading-font-family: the font family used for headings (h1, h2, h3, …). If none is defined, the--font-familyis displayed;--code-font-family: the font used for code blocks and examples;--doc-font-size: the global font size. The default value is 14px;--code-font-size: the font size used on code blocks and examples. The default value is 12px;--nav-font-size: the font size used on side and top navigation bars. The default value is 14px;--doc-font-weight: the default font weight. The default value is 500;--nav-font-weight: the font weight used on side and top navigation bars. The default value is 500;--logo-width: logo width, if the default width doesn’t fit your logo width;--logo-height: logo height, if the default height doesn’t fit your logo height;--doc-success-color: the color used for success messages;--doc-error-color: the color used for error messages;--doc-warning-color: the color used for warning messages;--doc-warning-light-color: the color used for warning messages with a lighter background;
You may also override styles using your own custom CSS, but keep in mind:
- We don’t guarantee the stability of HTML or CSS class names
- Custom overrides might break if we update the rendering engine
We are always open to adding more customization options: if you need to customize other parts of the UI, just send us a message and we’ll add the required CSS variables.
Technical requirements #
To use Embed Mode, you’ll need a reverse proxy or CDN that allows:
- URL rewriting
- HTTP header injection
Here is a list of typical platforms that support this:
- Fastly
- Cloudflare
- Amazon CloudFront
- Netlify Edge Functions
- …
If you do not find the tool you are using in this list, ask us directly, and we will tell you if your platform is compatible.
Best Practices #
SEO, bots & metadata #
- Since Bump.sh handles server-side rendering, metadata and titles are preserved
- Make sure your proxy does not block search engines if you want pages indexed
- Ideally, your proxy identifies legit bots and transmit the information to Bump.sh infrastructure using a custom header
Automatic translation #
- Embed Mode works natively well with localization platforms like Smartling
- Use your proxy to inject the correct language context and route the content through the tool you’re using
Be careful not to auto-translate reserved words (like
string,boolean, etc.)
FAQ #
What happens if the headers are missing?
The documentation won’t render in embedded mode. The default Bump.sh layout will be shown.
Can I use my own JS framework on top?
Yes. Just make sure your injected scripts don’t interfere with the core rendering.
Can I track page views with my analytics tools?
Yes. Just inject your analytics script via the head.